![The Decor Hacks [Trending Decor Design Ideas]](https://thedecorhacks.com/wordpress/wp-content/uploads/2025/01/cropped-the-decor-hacks.png)
DIY Camper Bathroom Remodel Ideas are a fantastic way to transform your camper into a cozy and functional space, perfectly tailored to your needs. With the rising popularity of camper living and travel, more people are exploring ways to upgrade their interiors, and the bathroom is often a top priority. A well-designed bathroom can greatly enhance both comfort and convenience during your adventures.
Stunning DIY Camper Bathroom Remodel Ideas
Replace the Shower or Tub
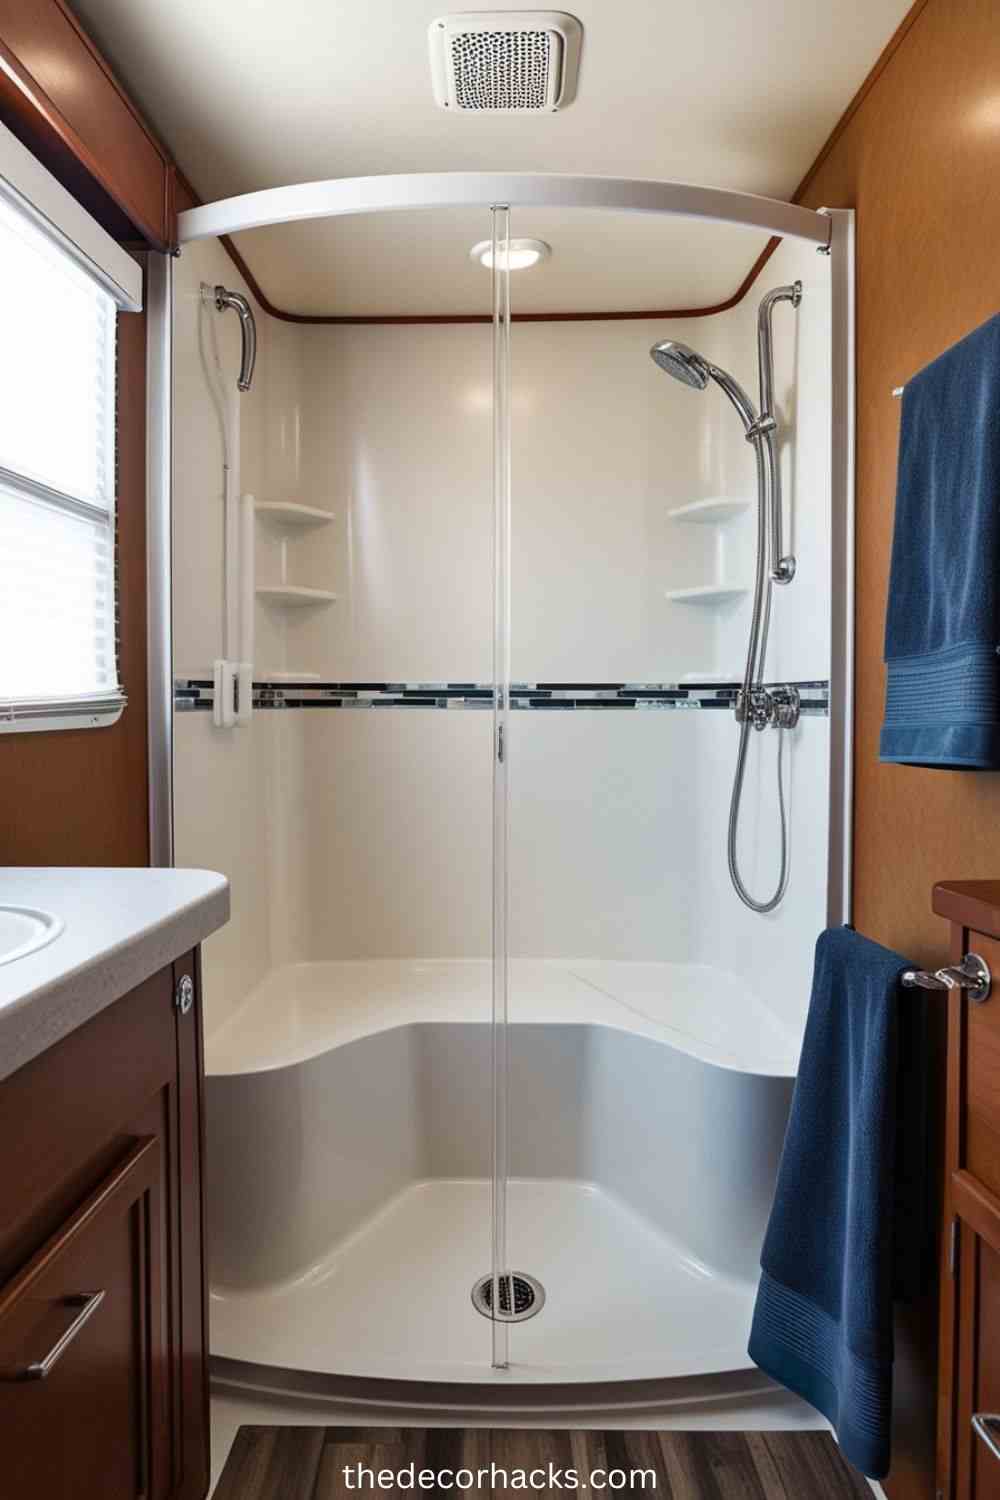
Upgrading the shower or tub in your camper bathroom can make a huge difference in both functionality and aesthetics. Opt for lightweight, durable materials like acrylic or fiberglass, which are perfect for compact spaces and easy to maintain. If a full replacement isn’t necessary, consider refinishing the existing unit with waterproof paint or epoxy for a fresh, new look. Adding peel-and-stick tiles or a shower surround can create a stylish, spa-like feel without adding unnecessary weight. This simple upgrade not only enhances the overall appeal of your camper but also ensures a more enjoyable showering experience on the road.
Upgrade the Toilet
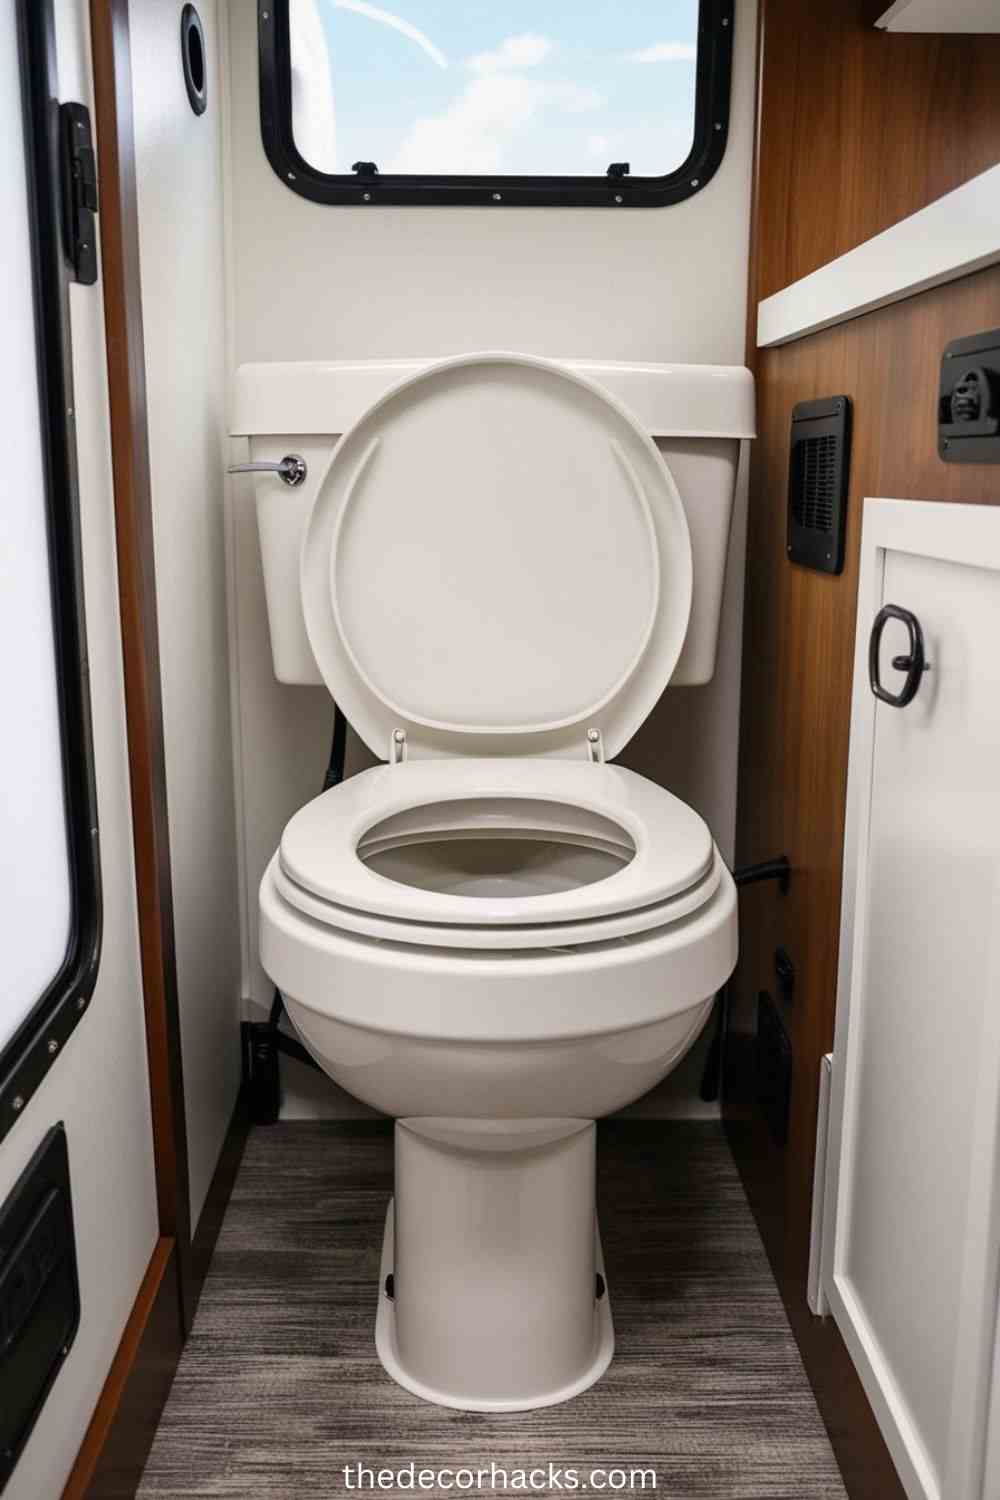
Replacing your camper’s toilet can significantly improve comfort, hygiene, and water efficiency. Consider upgrading to a composting toilet, which is eco-friendly and ideal for off-grid camping, or a low-profile RV toilet designed to save space. If a new toilet isn’t in your budget, you can refresh the existing one with a thorough cleaning and a coat of durable, appliance-grade paint. Adding a soft-close lid or swapping out old hardware can also elevate its functionality and style. An upgraded toilet not only enhances the practicality of your camper bathroom but also makes the space feel cleaner and more modern.
Install Stylish Flooring
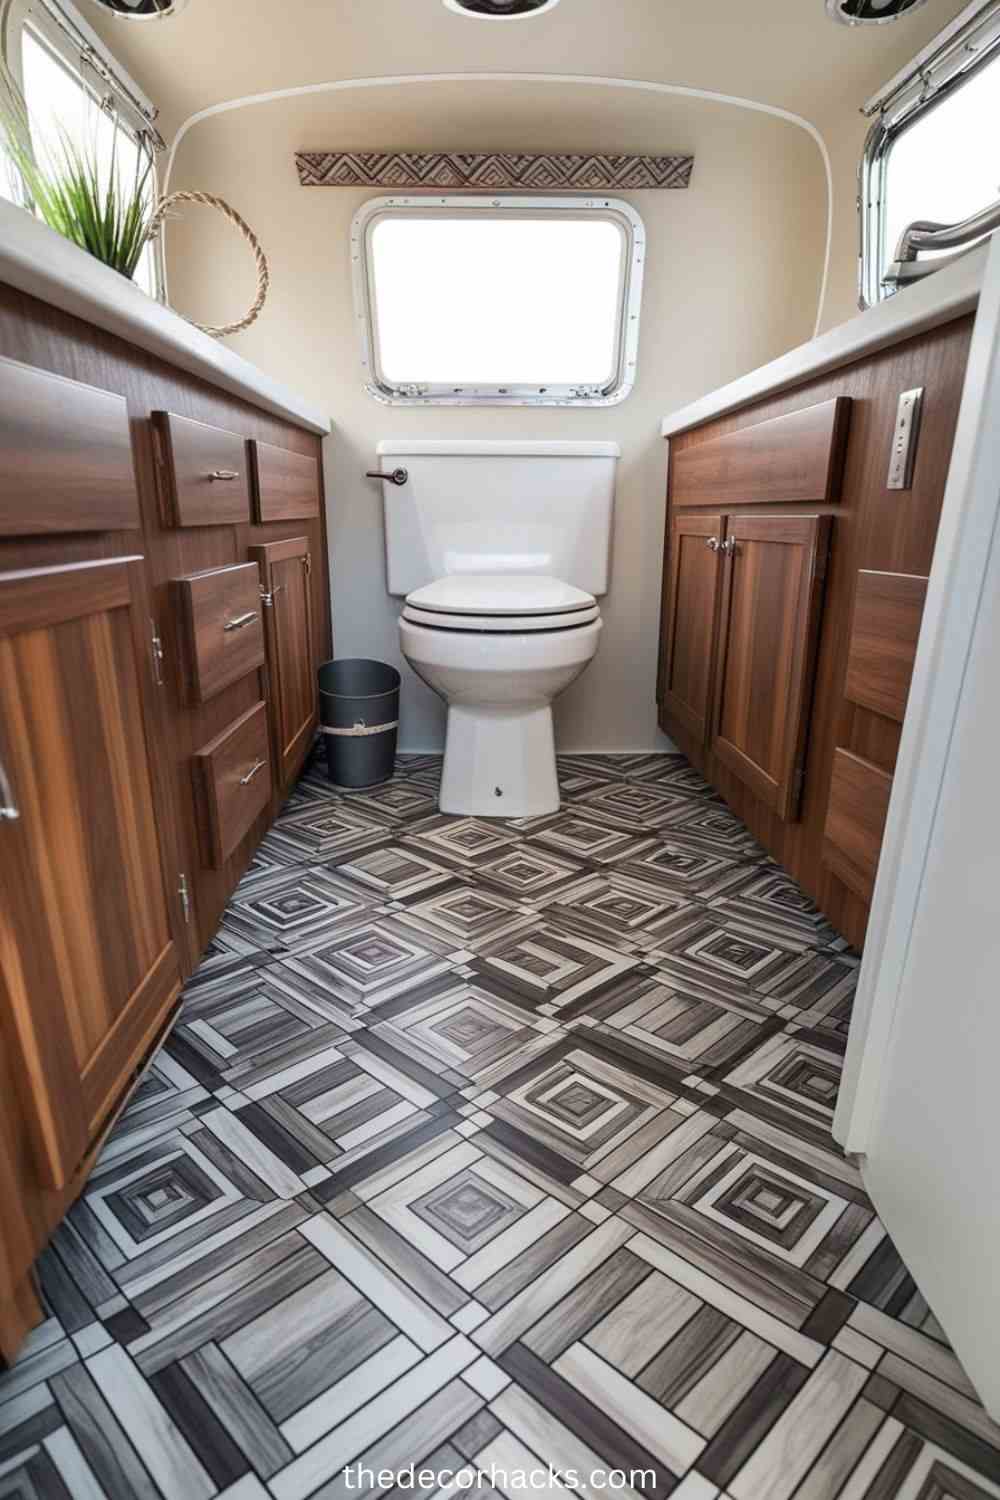
Updating the flooring in your camper bathroom is an impactful way to elevate the space while ensuring it remains practical for travel. Choose lightweight, waterproof options like vinyl planks, peel-and-stick tiles, or sheet vinyl, which are easy to install and ideal for resisting moisture. These materials come in a variety of styles, from wood-look finishes to modern geometric patterns, allowing you to customize the look to match your design vision. For a cohesive appearance, opt for slip-resistant textures that are both safe and stylish. New flooring not only enhances the aesthetics but also adds durability, making it a worthwhile upgrade for any DIY camper bathroom remodel.
Add Storage Solutions
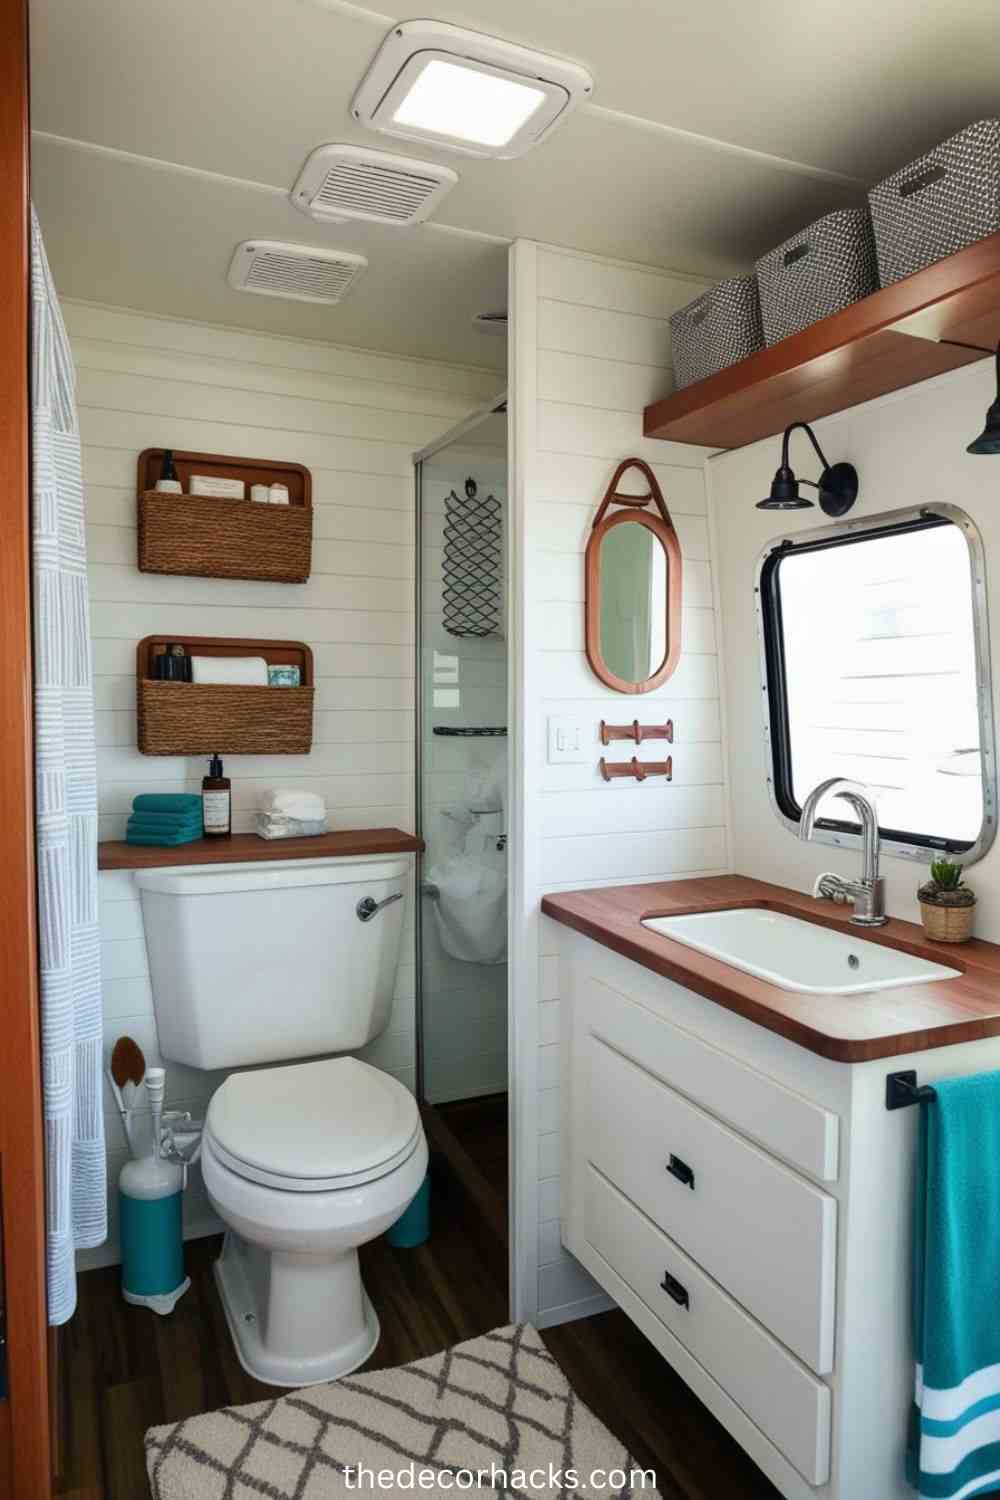
Maximizing storage in a camper bathroom is essential for keeping the space organized and clutter-free. Utilize vertical space by installing floating shelves or wall-mounted baskets for toiletries and essentials. Over-the-door organizers or suction cup caddies can provide additional storage without requiring permanent modifications. Consider recessed storage niches in the shower or wall-mounted hooks for towels to save space. Compact storage units or multi-functional furniture, like a vanity with built-in drawers, can also help you optimize every inch. With creative and efficient storage solutions, your camper bathroom can stay tidy while maintaining a stylish and functional design.
Improve Lighting
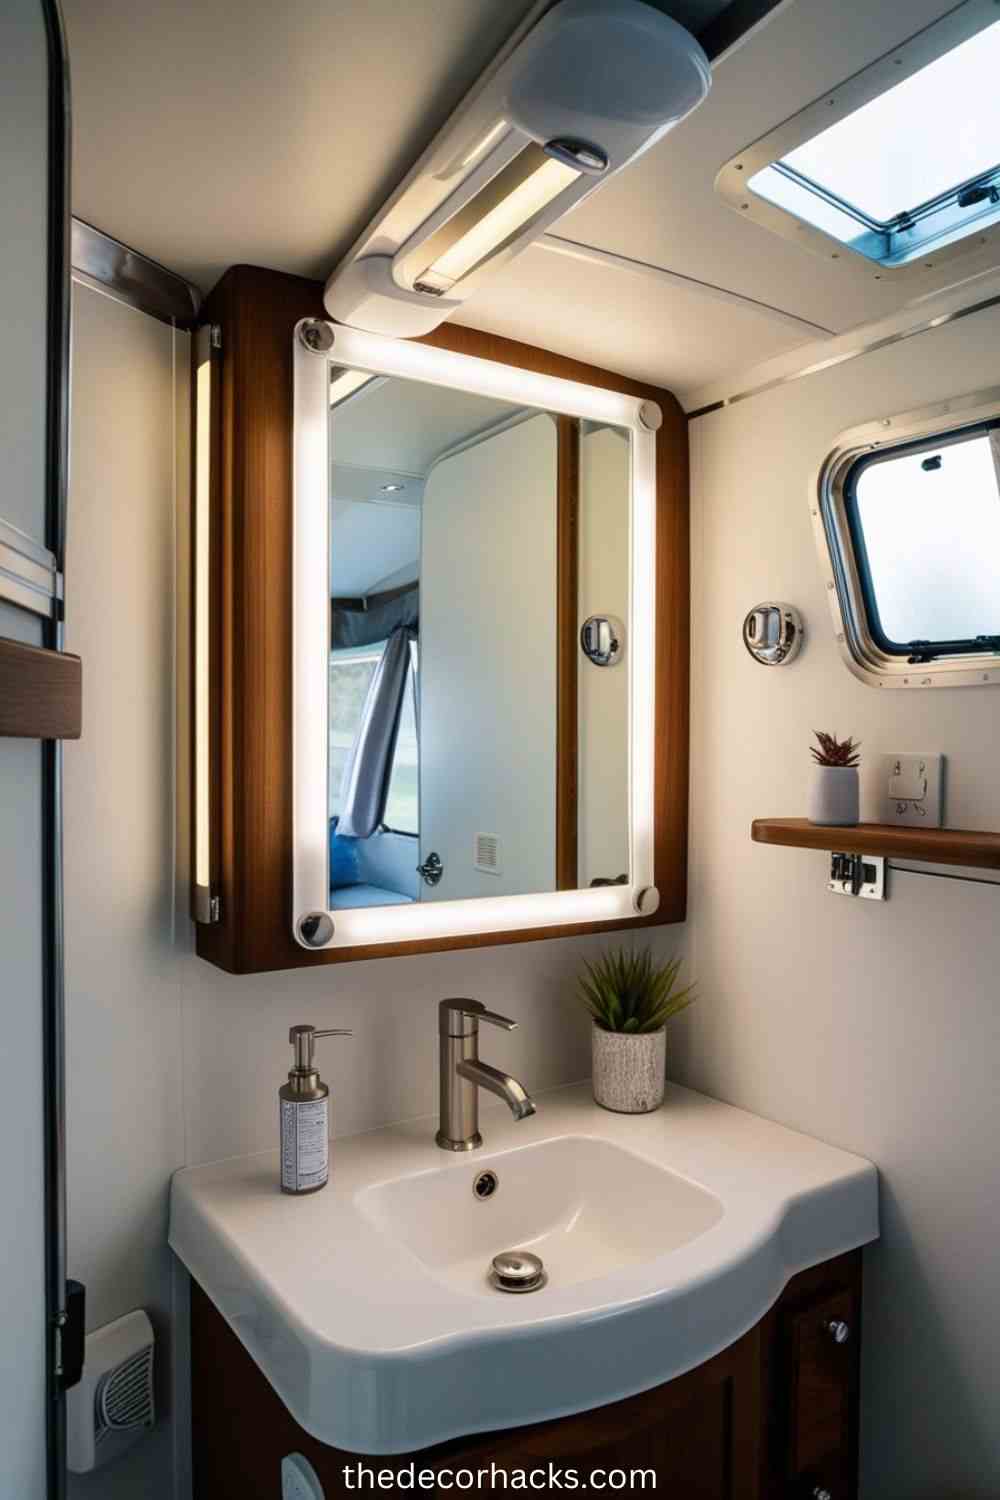
Lighting can dramatically transform the look and feel of your camper bathroom, making it brighter and more inviting. Replace outdated fixtures with modern, energy-efficient LED lights that provide excellent illumination while consuming minimal power. Consider installing strip lights around mirrors or under shelves for a functional and decorative touch. If natural light is lacking, adding a small skylight or a frosted window can enhance brightness while maintaining privacy. Smart lighting solutions, like motion-sensor or dimmable lights, offer convenience and help create the perfect ambiance. Upgrading the lighting is a simple yet impactful way to elevate the overall aesthetic and usability of your camper bathroom.
Freshen Walls and Ceilings
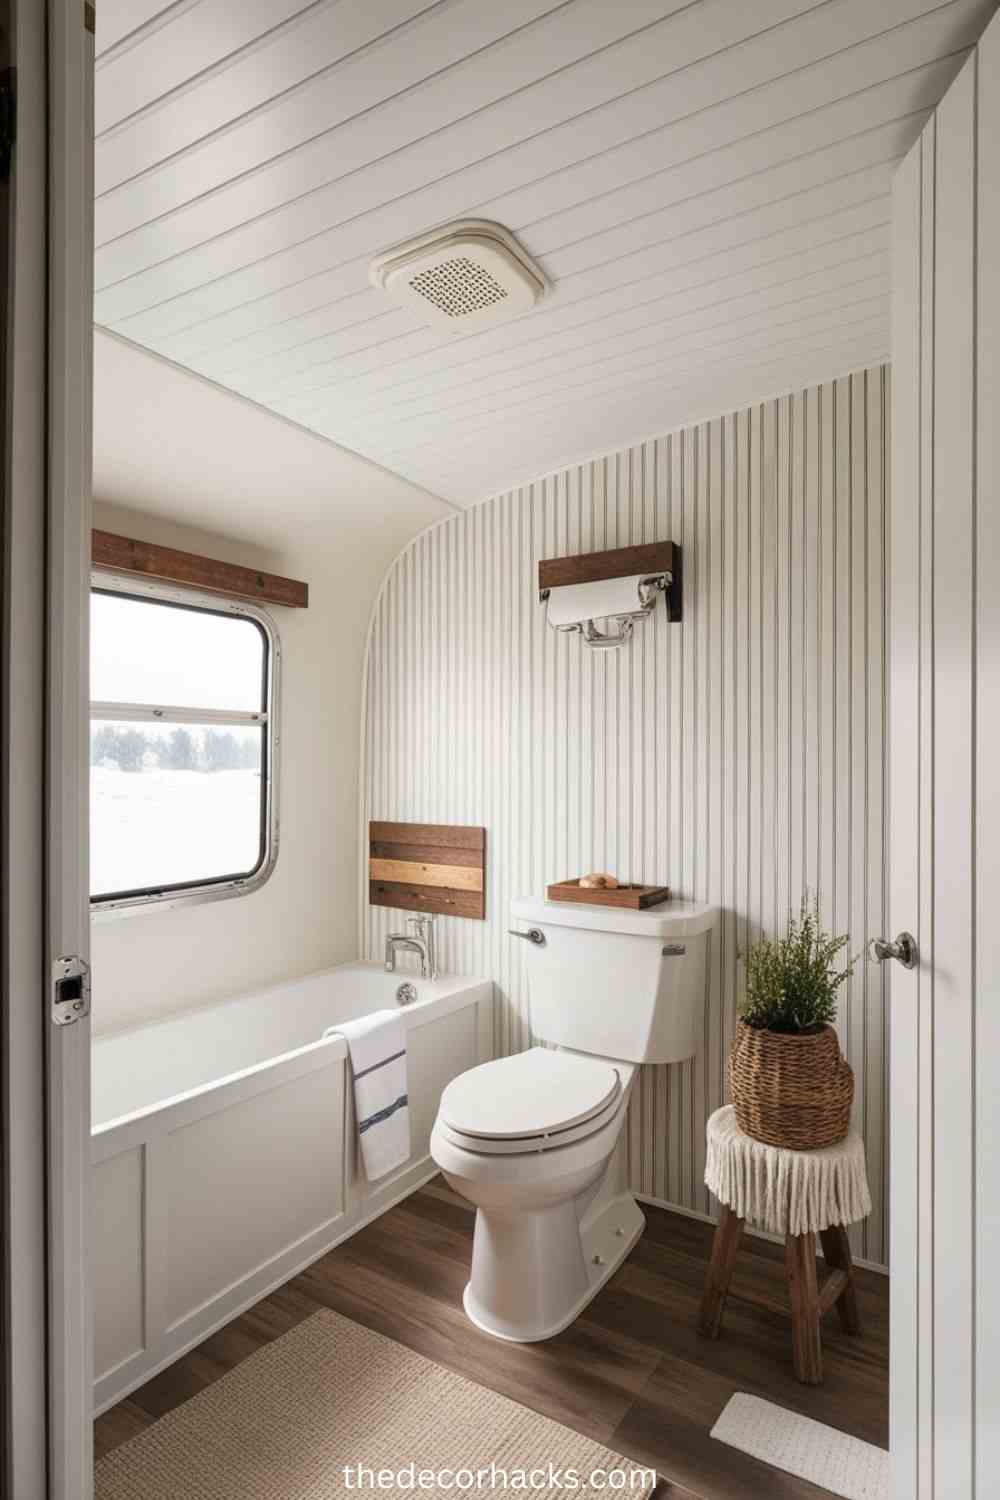
Revamping the walls and ceiling of your camper bathroom can instantly update its look and feel. Start by applying waterproof paint in light, neutral colors to create a spacious, airy atmosphere. For a more textured look, consider using beadboard panels or peel-and-stick wallpaper designed for high-moisture areas. These materials are easy to install and can mimic the charm of traditional or coastal designs. If you’re looking for a more rustic or modern aesthetic, reclaimed wood accents or vinyl shiplap can add character while resisting water damage. Freshening up the walls and ceilings is a cost-effective way to transform your camper bathroom and make it feel like a personalized retreat.
Accessorize for Style and Function

Accessorizing your camper bathroom not only adds personality but also enhances its functionality. Start by adding practical items like hooks, towel bars, or a shower caddy to keep everything within reach and organized. Opt for space-saving solutions such as a foldable towel rack or a magnetic soap dish. For style, introduce decorative elements like a colorful rug, themed shower curtain, or custom-made vanity mirror to complement your design. Baskets and storage jars are also great for keeping toiletries neat while adding a chic, cohesive look. By carefully selecting accessories, you can strike the perfect balance between style and function, ensuring your camper bathroom remains both beautiful and practical.
Upgrade Faucets and Fixtures
Upgrading the faucets and fixtures in your camper bathroom can make a significant impact on both its functionality and aesthetic appeal. Look for compact, water-efficient models that help conserve resources without sacrificing performance. Sleek, modern faucets with easy-to-clean finishes such as chrome or brushed nickel can bring a fresh, contemporary feel to the space. If you’re looking for a more rustic or vintage look, try a bronze or matte black fixture to add character. Don’t forget to replace other small details, like showerheads, towel bars, and cabinet handles, with matching finishes to create a cohesive design. These small but meaningful upgrades can elevate the look of your camper bathroom while improving its usability.
Create a Vanity Area
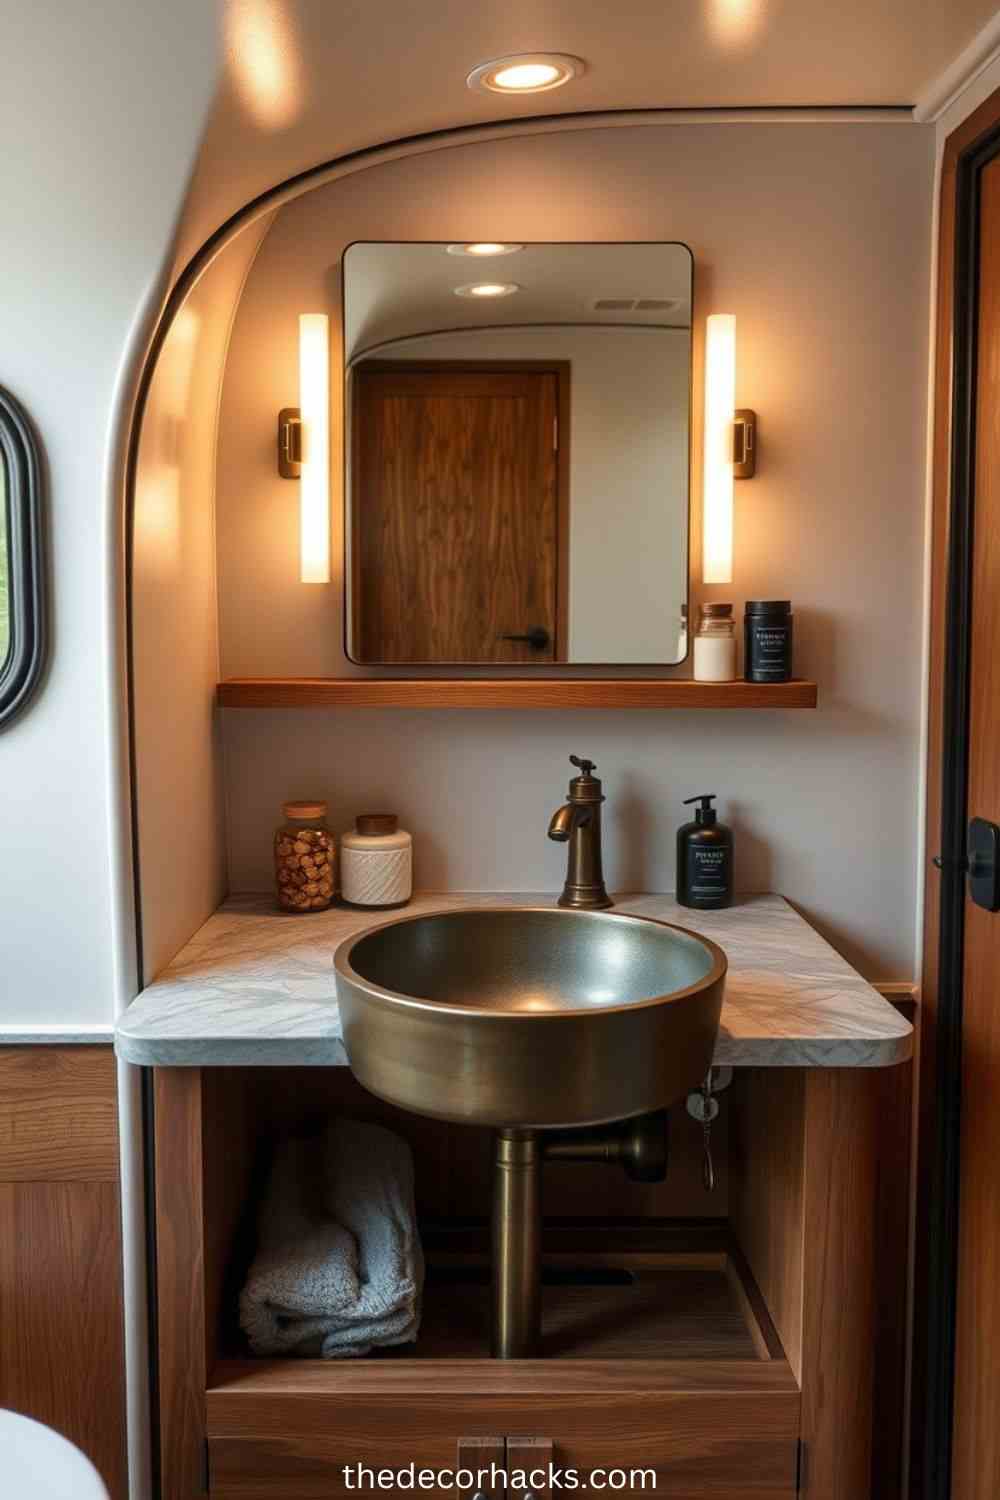
Incorporating a vanity area into your camper bathroom is an excellent way to maximize both space and functionality while adding a touch of luxury. Consider installing a compact, wall-mounted sink with storage underneath, which saves precious floor space while providing a functional vanity. If you have limited space, opt for a fold-out or collapsible countertop that can be tucked away when not in use. Adding a well-placed mirror above the sink, ideally with built-in lighting, will enhance both practicality and style. To further optimize the space, use stylish containers or drawers for toiletries and cosmetics. A well-designed vanity area makes your camper bathroom feel more like a home while keeping everything organized and easily accessible.
Add Greenery
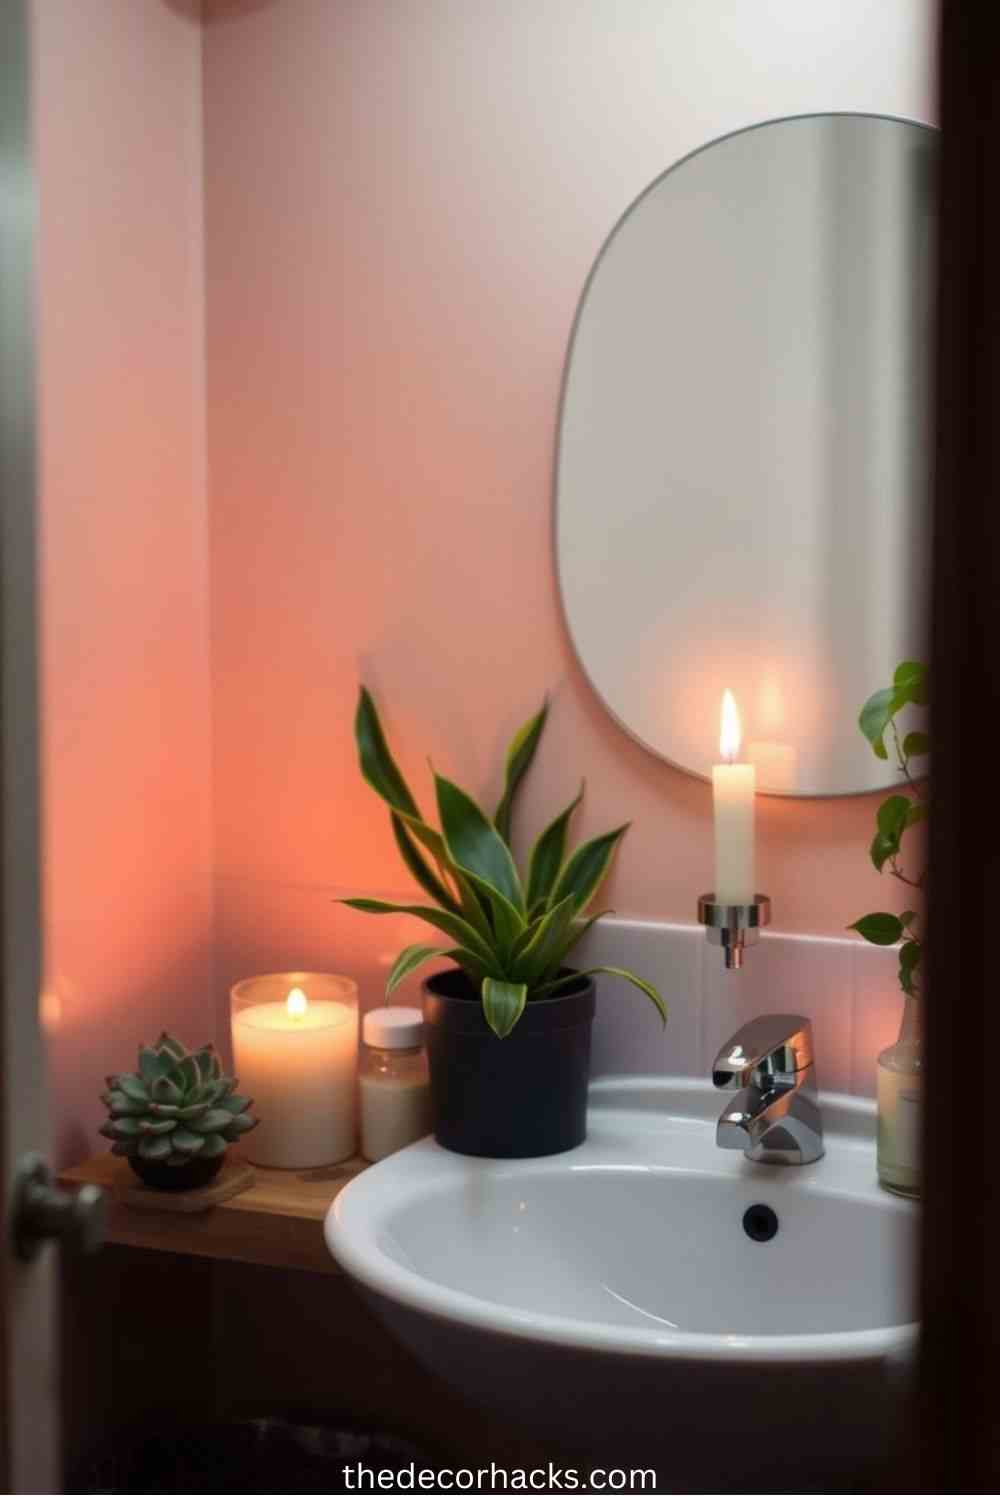
Bringing a touch of nature into your camper bathroom can instantly freshen up the space and create a calming atmosphere. Opt for low-maintenance plants that thrive in humid environments, such as succulents, air plants, or pothos. These plants not only add color and texture but also improve air quality. If you’re short on space, consider hanging planters, small potted plants on shelves, or a wall-mounted plant rack to maximize vertical space. For a more natural vibe, incorporate faux plants that require no upkeep yet still bring the same aesthetic benefits. Greenery helps transform a camper bathroom from a functional space to a relaxing retreat, making it feel more vibrant and inviting.
FAQ
1. What are the best materials for a DIY camper bathroom remodel?
The best materials for a camper bathroom remodel include lightweight, waterproof options like vinyl flooring, acrylic or fiberglass for showers, and moisture-resistant paint for walls. Peel-and-stick tiles, shiplap, and beadboard are also great choices for both durability and style.
2. How can I maximize storage in my small camper bathroom?
Maximize storage by using vertical space with floating shelves, over-the-door organizers, and wall-mounted hooks. Recessed storage, under-sink organizers, and multi-functional furniture can also help you make the most of every inch. Compact storage solutions like stackable baskets and hanging baskets can keep your bathroom organized without taking up extra space.
3. Can I install a new shower in my camper myself?
Yes, you can install a new shower yourself with some DIY skills. Choose a lightweight, compact shower unit or shower kit that fits the dimensions of your camper. You’ll need basic tools, some plumbing knowledge, and the right materials to ensure everything is properly sealed and waterproof.
4. How can I make my camper bathroom feel more spacious?
To make your camper bathroom feel more spacious, opt for light-colored walls, mirrors that reflect light, and compact fixtures. Installing a glass shower door or using clear shower curtains can also create the illusion of more space. Avoid bulky furniture and use minimalistic design principles for a clean, open look.
5. What type of lighting is best for a camper bathroom?
LED lights are ideal for a camper bathroom due to their energy efficiency and long lifespan. For added ambiance, consider installing dimmable lights or adding strip lighting around mirrors. Skylights or frosted windows can also bring in natural light while maintaining privacy.
6. How do I make sure my camper bathroom remodel is waterproof?
Ensure your remodel is waterproof by using moisture-resistant materials like waterproof paint, vinyl flooring, and acrylic or fiberglass for shower walls. Seal all joints and seams with silicone caulk, especially around the shower, sink, and toilet areas. Proper ventilation, such as a bathroom fan, also helps reduce moisture buildup.
7. Can I add a composting toilet in my camper bathroom?
Yes, adding a composting toilet is a popular option for campers, especially for off-grid living. Composting toilets are eco-friendly and conserve water, making them perfect for small spaces. Be sure to follow the manufacturer’s guidelines for installation and maintenance to ensure proper functioning.
8. What is the most cost-effective way to remodel a camper bathroom?
The most cost-effective way to remodel a camper bathroom is to focus on simple upgrades like replacing old fixtures, painting the walls, and adding peel-and-stick tiles. DIY projects, such as refinishing existing furniture or installing budget-friendly materials like vinyl flooring, can make a significant difference without breaking the bank.
9. How do I ensure the safety of my camper bathroom remodel?
Safety is important when DIY Camper Bathroom Remodel Ideas your camper bathroom. Use non-toxic materials for paint and finishes, ensure all electrical work is done correctly (or by a professional), and properly seal plumbing connections to avoid leaks. Additionally, consider using slip-resistant flooring and ensuring adequate ventilation to prevent mold growth.
10. Can I add a vanity to my camper bathroom?
Yes, adding a compact vanity to your DIY Camper Bathroom Remodel Ideas is a great way to maximize both storage and functionality. Look for space-saving options, such as a wall-mounted vanity or one with built-in storage to keep your bathroom organized and stylish. Be mindful of the size to ensure it fits well in your space.

Hi! I’m Meg Yoder, a Pennsylvania-based designer with a passion for brand development and home decor design. Creativity has always been my driving force, whether I’m crafting a cohesive brand identity or reimagining a living space with unique decor hacks.
I created TheDecorHacks.com as a space to share my favorite design ideas, tips, and inspirations. From DIY projects to expert insights, my goal is to help you transform your spaces into something extraordinary—without breaking the bank.
When I’m not busy designing, you can find me exploring vintage markets, experimenting with color palettes, or sipping coffee while sketching my next big idea. Let’s create something beautiful together!